Objective
To efficiently create, customize, and publish a professional agent's landing page using Wix, SuiteDash, and GoDaddy, ensuring seamless integration, proper styling, and functionality for client use.
Step 1: Access Wix and Duplicate the Page
- Log in to Wix Website Editor.
- Navigate to the Home page and select Manage Pages from the top menu.
- Locate the Client Concierge page, which is currently hidden.
- Click the Options button and select Duplicate Page.
- If prompted, select Don’t Show This Again, and proceed with duplicating.
Step 2: Rename and Update Page Details
- After duplicating the page, update the page name to reflect the Company Name.
- Click the Done button to save changes.
- Go to the Options menu for the page and select SEO Basics.
- Update the URL Slug to match the company name, ensuring there are no spaces.
- Confirm that the Page Title has been updated to the company name.
Step 3: Embed the Form into the Page
- In SuiteDash, navigate to the Forms section.
- Locate the form you created for the agent.
- Click on Options, then select Link and Embed.
- Update the Friendly URL to reflect the company name (no spaces).
- Scroll to Embed Options and copy the Embed Code.
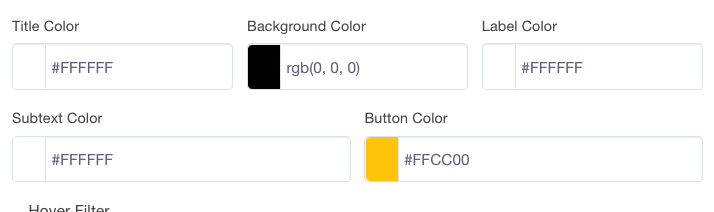
Step 4: Style the Form
- Update the following form styling options to ensure it aligns with the website theme:
- Title Color: #FFFFFF
- Background Color: rgb(0, 0, 0)
- Label Color: #FFFFFF
- Subtext Color: #FFFFFF
- Button Color: #FFCC00

- Preview the form on the right side to confirm the changes.
Step 5: Add the Form to the Wix Page
- In Wix, go to the duplicated page.
- Click the Add Element (+) button and select Embed HTML.
- Choose the option to embed a Website Address.
- Paste the Embed Code from SuiteDash.
- Resize and stretch the embedded form to fit the designated space.
- Center the form on the page for proper alignment.
Step 6: Set Up Subdomain Redirection in GoDaddy
- Log in to the GoDaddy account. For instructions, please visit this help document.
- Create a subdomain redirect link for the agent’s landing page.
- Example:
sampleco.brokerbee.com.
- Example:
- If a subdomain is not set up, the URL will default to
brokerbee.com/sampleco.
Step 7: Publish the Page
- Review the entire page to ensure all elements are correctly updated and styled.
- Click Publish to make the page live.
Step 8: Mark the Task as Complete
- In the task management system, mark the task as complete.
- This action will:
- Send an email to the agent notifying them that the website is complete.
- Update their dashboard to reflect the website’s completion.
Tools and Access Needed
- Wix Website Editor Access
- GoDaddy Account (for subdomain redirection)
SuiteDash Links
Quality Assurance Checklist
Before marking the task as complete, verify the following:
- Page name and URL slug match the company name.
- Form is embedded correctly, styled properly, and aligned.
- Subdomain redirect is functional in GoDaddy.
- Email notification is prepared and dashboard reflects updates.